Thursday 22 November 2012

Battle Report 2: Bretonnians vs. Vampire Counts

I just realized that I have THREE unwritten 8th Ed. battle reports to catch up on... great battles which took place in the hazy fog that was the last days of my thesis and so thus far haven't seen the light of day.  So, let's see what I can remember.

The first game was a 1500 pointer against one of the Modest Modeler's Vampire Counts, who had defeated my Bretonnians in our first 8th Edition outing.  We rolled up the 'Blood and Glory' scenario, which bases victory on the number of lost banners and slain generals.  As I recall I had a slight advantage because ghouls don't have much use for banners (probably because they are inedible) while my Bretonnians pretty much insist that the only civilized way of killing something is under a rippling silken banner (more cinematic, you see).

DEPLOYMENT:

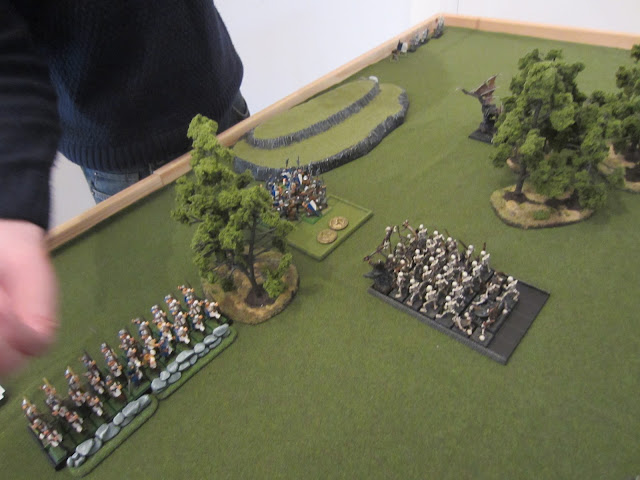
In my last game my knights had been deployed too far apart to coordinate their charges effectively and got bogged down, so this time I tried grouping a large unit of knights of the realm (KoTR) with my general and a damsel and a large unit of knights errant (KE) on my right flank with my BSB.  I lined up a horde (30 I think) of archers in the middle, and 24 men-at-arms with halberds on the right (just behind the trees).  I took 5 mounted yeoman (truffle hunters!) and marched them up beyond the middle trees in a vanguard move.  My general idea was to old up (at least a bit) the undead hordes with my peasant wretches and roll up the Vampire Count's line from right to left with a combined flank charge.  The mounted yeomen on the far left were basically there to hold up the vargheist.

  
My opponent lined up three large blocks of living dead: from (MY) left to right there was a block of ghouls, a block of skeletons with hand weapons along with the terrifying red raged Vampire Lord general, and then a solid block of skeletal spearmen and a lesser (though still horrifying!) Vampire.  The dreaded Vargheist was on my far left, behind the trees.

TURN 1:

In the face of unholy horrors, my devout Bretonnians dismounted and got out their prayer beads to invoke the Blessing of the Lady.  The Vampire Counts took turn 1 and began their relentless advance, shuffling all units across the board.


Now things started to get more interesting... the Dread Vampire Lord lead his skeletons with unholy speed towards my terrified men-at-arms, and then charged!  Cowardly curs that they are, the peasants turned and fled!  The rest of the undead shuffled forward relentlessly.

If you look carefully you can see the vargheist emerging from the dark woods towards the back of the table (I told you he was there!) having ignored my pathetic truffle-hunting mounted yeoman for a bigger feast.


 My peasants were also obviously shaky... their volley of arrows did little to thin the oncoming skeletal ranks.  Undeterred by the (predictable) cowardice and incompetence of the peasantry, my noble knights swung around ready for a glorious charge...

TURN 2


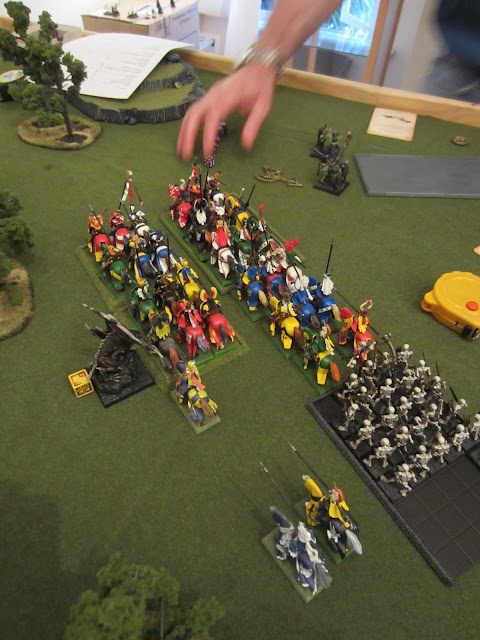
 Crash!  Both my KoTR and KE hurtled into the skeleton horde... skeletons were shattered this way and that, but the shock of even both charges did not break them and my knights were caught up in a slow battle of attrition.  Better news on the left flank, as my mounted yeoman harassed the vargheist, peppering it with arrows and actually wounding it while slowing its advance.

TURN 3


 The Vampire lord runs my fickle men-at-arms off the board... claiming the first banner of the game!  My knights continue to struggle to hack their way through the seemingly endless skeletal horde before them. Worse still, the Vampire ripped the throat out of my battle-standard bearer! Dire times for the Bretonnians...

TURN 4(ish?):


Obviously the war-artist stopped painting to find a safer tree to hide in at this point because I missed out on some photos here...  Basically the Vampire Lord and his skeletons made short work of my hapless peasant archers, running them down and claiming a second vital banner.  He then reformed, ready to attack my knights in the rear.

The vargheist continued its advance, harassed at every step by my mounted yeomen.  The hunters had brought the vargheist down to just one wound, and one well placed arrow would have ended the threat to my knights' flank, but twas sadly not to be.

My Bretonnian knights finally hacked their way through the skeletal spearmen, kicked their mighty chargers into a charge and smashed through the ghouls as well!  A glimmer of hope for the servants of the Lady!

TURN 5:


Disaster!  The Vampire Lord and his skeletons made an improbable charge straight into the rear of my KoTR.  The vargheist hurtled into the flank of the KE.


 The Vampire Lord issued a challenge, and my gallant general of course accepted!  Despite his valour, however, he was no match of the Vampire Lord who contemptuously cut him down where he stood.  The loss of my general and two banners meant that the Vampire Counts claimed victory in terms of blood and glory!


Border Princes Campaign 5: The Fortress-Town of Malko Continued

Ok, so here at last is my design for the towers of the fortress-town of Malko, to go along with the walls I and gate-section I designed in my last post.  I've also put a little concept sketch in, just for fun.

Now I HAVE gotten more done other than my little scribbles since last I posted.  With the help of one of the Modest Modellers I have completed the foundations (pdf) for the modular sections of Malko's walls, gates and towers:


It probably doesn't look like much at this point, but I am REALLY pleased with the dimensions.  The way it will work is that there will be enough room to deploy infantry three ranks deep on the walls, five ranks deep above the gates (in the centre) and in ranks of 6x6 on each of the towers.  This is also taking into a account space (1 cm) for the facade of the fortress: the bricks (representing the ancient foundations) and patchy log palisade (hastily thrown together to supplement the ruined battlements) which will cover the outside of the structure and provide cover to troops on the ramparts.

One of the Modest Modellers kindly gave me some foam board which just happens to be the perfect size to form the base of the wall, and I already have some pieces which are perfect for cutting into 'bricks' for the facade.  I am also busy collecting dowels and appropriately sized sticks for the palisade portion.

You can probably make out the pencil lines on the gatehouse section which marks out where the opening for the gates will be - this has space to allow units with ranks of 5 to pass through.  Of course, each section is modular, and I have cut extra foundations with which to make sections of wall and tower which have been breached/destroyed (as I am sure will happen in the bloody sieges we fight for Malko!).

Wednesday 14 November 2012

Border Princes Campaign 4: The Fortress-Town of Malko


Right, today I am looking at the first special territory for our Border Princes, the fortress-town of Malko!  Malko is described as the key strategic location along the Silk Road: holding Malko alone doesn't quite make you master of the Border Princes, but it DOES give you 10 victory points which is sure to help!

Malko is built on an ancient fort which has been taken and retaken innumerable times, such that only the original foundation stones remain intact and the rest is largely makeshift palisade.  If a Banner which controls Malko is attacked, then the SIEGE scenario (adapted from the 6th Ed. rulebook) is used as the defending Banner retreats into the city walls.  Furthermore, any Banner which controls Malko is automatically counted as being FORTIFIED (plus 200 points of troops defending) and cannot be FORTIFIED further.

My thoughts on building the fortress walls of Malko are based on those in the GC, but I have modified the scale so that the different bits of fortress can be incorporated into GWs generic 'Warhammer Fortress' should we ever acquire one!  I've posted some preliminary ideas below:


Materials are still a bit up in the air.  So far my thoughts are:
Base = MDF
Rampart = balsa wood
Palisade = sharpened wooden dowels

I am not quite sure about the original stone foundations though - possibly foam bricks if they can be bought/constructed relatively cheaply and easily.  This part isn't essential to play the scenario, however, mostly its about the aesthetic of the ancient, battle-scarred foundations!

I will add plans for the watchtowers as soon as I've found out the dimensions of the towers for the Warhammer Fortress. 


Monday 12 November 2012

Border Princes Campaign 3: Plains Terrain


We have started having a look at what terrain we have for our forthcoming Border Princes map-based campaign, and what terrain pieces we still have to build.  With this in mind I am starting to have a look at each type of territory type, the types of battles fought in each, and what terrain ideas spring from that.  First off, the plains sections!

In the Campaign Phase, Banners can move into Plains Sections without penalty.  The GC says that Plains Sections may contain 'farms, small towns, hills and the like.'  In other words, Plains territories represent the 'usual' battlefields on which most casual games of WFB are played.  While the GC says that all battles fought in non-special territories should be 'Pitched Battles' ('Battleline' in 8th Ed.), I'm not keen on this at all.  We really like the variety of the full range of scenarios from the 8th Ed. Rulebook, so I am going to just modify the table based on the terrain type rolled.

For the Plains Sections, the only 'standard' 8th ed. battle which doesn't seem that appropriate is the 'Defend the Pass' scenario (makes much more sense in the Mountain Sections), so I'll remove that one.  What to replace it with?  There are a number of excellent scenarios in the old 6th Ed. rulebook which do not have 8th Ed. equivalents which we could make use of, and for the Plains Sections both the 'Breakthrough' and 'Flank Attack' scenarios look promising.  Another possibility is to give a nod to the prevalence of Battlelines in the original GC campaign by replacing 'Defend the Pass' rolls with an extra chance at 'Battleline.'  And one final thing to consider is that the 'Watchtower' scenario doesn't really make sense if one player has already FORTIFIED a territory (see here for the FORTIFY rules: http://ubersreik.blogspot.com.au/2012/11/border-princes-campaign-2-how-it-works.html).

NOTE THAT THE INFORMATION BELOW CONCERNING SCENARIOS FOR PLAINS SECTIONS HAVE BEEN SUPERSEDED HERE.

So this is what I've come up with.  When two enemy Banners in one territory resolve a battle they roll on the following d8 table:

1.) Battleline
2.) Dawn Attack
3.) Battleline (WAS 'Battle for the Pass')
4.) Blood and Glory
5.) Meeting Engagement
6.) Watchtower (but if in FORTIFIED TERRITORY, play 'Battleline' instead)
7.) Breakthrough*
8.) Flank Attack*

*If the Battle is the result of a Banner MOVING into another faction's territory (an invasion), then that player is automatically the ATTACKER in this scenario.  If BOTH opponents MOVED into a third territory in which a battle is to be resolved (in other words, the territory belonged to NEITHER player before the battle is decided) then ROLL to see who is the attacker and who is the defender.

The benefits of this table are that they provide variety, while keeping true to the 'spirit' of battles in the Plains Sections, because Pitched Battles remain common (but not INEVITABLE) and the other scenarios are suggestive of open terrain with lots of movement.

Terrain wise, we obviously need lots of hills and forests.  Fortunately, one of my regular gaming opponents has heaps of these, and another has just gone on a hill-building spree with beautiful results (see below):


That's all for now, more to follow soon.

Saturday 10 November 2012

Border Princes Campaign 2: How it works

OK, so one of my regular opponents has been very busy getting a head start on terrain for the campaign and I'm keen to get some of it up here because it looks really good, but to start here are the basics of the way the campaign runs.

Each Campaign Phase goes like this:
  1. Email Orders (see below)
  2. Execute Orders (see below)
  3. Fight Battles (this is where the Battle Phase takes place)
  4. Retreat/Scatter Moves
  5. End of Turn
Email Orders:
Each player will email their orders to the Gamemaster (GM) - that's me - at an email address I will set up specifically for the campaign.  Then the orders are resolved SIMULTANEOUSLY.  Because I am both playing and GMing I will always email my army's orders FIRST before asking the other players to submit their orders.  This will prevent me from being tempted to peek at others' orders before making mine!  Also, at the end of the campaign the players are free to look through the email account of orders to make sure nothing shonky has gone on :-).  But my regular gaming mates trust me (I think).  If a player doesn't submit any orders for one or more of his Banners, then those Banners are assumed to take the HOLD order.

Types of Orders:

Each Banner takes 1 of the following 4 Orders each Campaign turn:

  • Move
  • Fortify
  • Recover
  • Hold
  • Raze and Hold
  • Raze and Move
MOVE: 
  • Banners may move into any adjacent territory (any territory where the borders touch).
  • If there are no enemy Banners into the territory a Banner moves into, then that faction controls the territory (places a control marker on the territory).
  • If a Banner is moving into DIFFICULT TERRAIN  then there is a chance that movement is halted.  For mountains, swamps and crossing rivers, a d6 is rolled for the banner, and on a 1 or 2 the Banner is halted by the difficult terrain and must perform a HOLD action instead.  According to the official rules, forest territories are not difficult terrain, but I think there should be some penalty for moving through forested regions, so my current ruling is that Forests halt movement on a roll of 1.
  • When enemy Banners end their turn on an a common map section, a battle takes place in the Battle Phase (e.g., an Empire Banner moves from territory A to territory B, and an Orc Banner moves from territory C to territory B).
  • When two enemy Banners BOTH receive orders to move into each other's territory in a situation that would involve them 'swapping' territories, the DON'T PASS IN THE NIGHT RULE comes into effect.  A d6 is rolled for each Banner and the Banner with the higher roll is considered to have 'got the jump' on the lower-rolling Banner, whose general is forced to dig in and prepare to defend.  In other words, the higher rolling player gets to MOVE and the lower rolling player is forced to HOLD. (e.g. an Empire Banner submits orders to move from territory A to territory B, but the Orcs in territory B submit orders to move from territory B to territory A!  The two armies DON'T PASS IN THE NIGHT: a d6 is rolled for each Banner and the Empire Banner gets 3 while the Orc Banner gets 6.  Thus the Empire Banner is forced to HOLD in territory A while the Orc Banner MOVES from territory B to territory A.  In the battle phase, a battle will ensue!
  • Each Banner is assumed to support itself mostly by LIVING OFF THE LAND (hunting, requisitioning from the locals, raiding, pillaging, etc.) and as such each territory can only support (read feed) ONE Banner at a time.  Thus NO MORE THAN ONE Banner from any one faction OR an allied faction (friendly banners) may end a turn occupying the same territory.  In the event that this occurs, normally one Banner will be forced to HOLD (specific rules to follow - they don't come into play much).  The ONLY TIME two Banners are allowed to end in the same territory is if they are enemy Banners, in which case a battle is resolved in the Battle Phase (see above).
  • A reminder that once Orders have been submitted, movement is resolved SIMULTANEOUSLY, so it is possible for one Banner to seize a territory that an enemy Banner is vacating (except in the event of the DON'T PASS IN THE NIGHT rule).  All failed movement (e.g. because of DIFFICULT TERRAIN, DON'T PASS IN THE NIGHT, no orders emailed, etc. count as a HOLD move.)
FORTIFY:

  • If given FORTIFY orders and not brought to battle, a Banner may spend the Campaign turn conscripting locals, repairing defensive walls, taking advantage of terrain, building hasty barricades etc. to make that territory more defensible.
  • Once FORTIFIED, a Banner in a territory gets to ADD 200 POINTS to its total Banner size WHILE IN THAT TERRITORY (e.g. A Vampire Counts Banner which fortifies a territory gets its usual 2250 points + 200 points = 2450 points if attacked in this territory).
  • Furthermore, a Banner which is defending a FORTIFIED territory gets the following advantages: AFTER terrain has been placed and deployment sides have been chosen but BEFORE troops have been deployed, the defending FORTIFIED Banner may REMOVE any one terrain feature.  Furthermore, the defending FORTIFIED Banner may ADD a DEFENDED OBSTACLE rolled on the table below ANYWHERE ON THE TABLE:
Roll d6
1 = a large hill
2 = a wall, fence, earthworks, or hedge, 6-12 inches in length
3 = a hill with an impassable slope
4 = a building no larger than two stories and a footprint no larger than 8x8
5 = a large hill with fences or artillery emplacements on top of it
6 = a watchtower

  • Note that FORTIFYING a territory more then once accrues no additional benefits.
  • A territory remains FORTIFIED as long as the FORTIFYING Banner remains in the territory.  As soon as the Banner moves, all fortifying benefits are lost (even if replaced by a friendly Banner).
  • A RAZED territory may NOT be FORTIFIED until it has been RECOVERED (see below).
  • A territory may not be FORTIFIED in a turn when it is invaded by an enemy Banner, in this case the FORTIFYING banner makes a HOLD move instead (e.g. An Empire Banner places FORTIFY orders for territory A, and an Orc Banner places MOVE orders from territory B to territory A.  In this case, the Empire Banner must HOLD without any benefit of FORTIFICATION, and a battle is fought with the Orcs in the Battle Phase.  If the Empire Banner had FORTIFIED the PREVIOUS turn, then the Orcs would be battling a FORTIFIED Empire Banner).

RAZE:

  • A Banner may RAZE a territory in which it is located (e.g. burning crops, slaughtering the locals, destroying homes) to make it unusable for supply purposes.  A RAZED territory can still be controlled by a faction, but does not contribute to the number of Banners a faction can support (and will not count for victory points at the end of the campaign!) unless it is RESTORED.
  • Furthermore, a RAZED special territory provides non of its usual benefits unless noted, and that RAZED bridges can no longer be used to cross rivers without penalty.
  • A Banner may either RAZE AND HOLD or may RAZE AND MOVE, which involves RAZING the territory you are currently in and then performing a MOVE order into an adjacent territory - ie. burning and pillaging as you go/scorched earth.  When a Banner RAZES AND MOVES it must roll a d6 - on a roll of 1 or 2 the Banner has spent too long burning and looting in the territory and must RAZE AND HOLD instead (e.g. an Orc Banner is in Territory A, and declares a RAZE AND MOVE to territory B order.  On a d6 roll of 3-6 the Orc Banner may RAZE territory A and move to territory B (ripe for plunder!), but on a roll of 1 or 2 the Orc Banner RAZES territory A and then HOLDS there).
  • Note that RAZING is a great way of starving out your opponents' forces, forcing an elusive enemy to give you battle, or falling back from a more powerful opponent while preventing them from reaping the benefits of their conquest.  
RECOVER:

  • A Banner given RECOVER orders may attempt to restore a territory which has previously been RAZED (rebuilding, replanting, resettling displaced refugees, etc.).
  • On a d6 roll of 4-6, the territory is successfully RECOVERED, and contributes towards army supply and victory points and restores special territory benefits.  
  • If the RECOVER attempt fails and the Banner tries to recover the territory in the next turn, a +1 is added to the d6 roll (and so on in following turns), though a RECOVER roll of 1 always fails.
  • A RECOVER attempt will NEVER SUCCEED if a Banner is brought to battle - if a Banner issues the RECOVER order and an enemy Banner moves into that territory, the defending Banner must HOLD instead and a battle takes place in the Battle Phase.
HOLD:
  • A Banner given HOLD orders remains in place and does nothing.  This may occur when wanting to just occupy a FORTIFIED territory or when there is no advantage from moving.
  • Failed attempts at FORTIFYING, MOVING into DIFFICULT TERRAIN, RAZING AND MOVING and RECOVERING result in a HOLD move, as do situations involving the DON'T PASS IN THE NIGHT RULE, when LIVING OFF THE LAND prevents more than 1 friendly banner being in one territory, or when a player does not issue orders for a particular Banner.
Right, that's MORE than enough for now.  Now that we have the basics of the campaign rules down, I will start organizing the terrain we need for the various territories/battlefields.


Tuesday 6 November 2012

Border Princes Campaign 1: Overview

Right, my thesis is done and dusted and it is time to get going with some serious modelling and gaming projects.  My first cab off the ranks is to start setting up a map-based campaign to provide some narrative and thematic structure for WFB games with my regular opponents.  

I have long wanted to have a go at the Border Princes map based campaign from the amazing General's Compendium, so my aim is to set this up for 8th Edition.  


The basic idea is as follows:

  • The map (see above) is divided into territories which may be either plains, road, bridge, river, forest, mountains, or swamp.  There are also six 'special' named territories - the ruined High Elven tower of Tor Anrok, the cosmopolitan town of Aldium, the fortress-town of Malko, the bandit-infested Warrens, the haunted Geistenmund Hills and the tribal lands of the Iron Claw Orcs.
  • Each player controls a force which is made up of 'banners' (armies essentially) which are moved around the map.  Each 'banner' normally represents a 2,250 point army (though there are ways to increase the pts. of each banner, eg. fortifying, allies, etc.).
  • Each Banner is not a 'fixed' list - the 2250 points are chosen differently every battle.  It is assumed that  between battles troops are redistributed across the players' realm, etc.  This keeps bookkeeping simple, which for a first campaign is very important.  Of course, each Banner should absolutely have an appropriate name, named characters, etc.!
  • The campaign is divided into a 'Campaign Phase' and a 'Battle Phase.'  In the Campaign Phase players move their Banners around the map, muster new banners, or perform all sorts of other campaign related activities (more to follow).
  • When two enemy Banners find themselves in the same map region at the end of the Campaign Phase, a battle takes place.  Basically, once all campaign moves have been completed, the players will have a month-6 weeks (to be determined) to resolve any battles that take place.  Different terrain sections (including the special map sections) will impact the battles/scenarios used (more to follow).
  • The Campaign will last a set number of turns which is calculated by the number of players taking part. At the end of the campaign, each faction adds up all the territories it controls: 1 point for each normal territory, 5 points for each special territory and 10 points for the fortress-town of Malko!  The faction with the most points emerges dominant and secures a new kingdom in the Border Princes (though such kingdoms tend to come and go in the chaotic lands of the Border Princes).
Right, that's all for now.  Next time I start thinking about the terrain we need and the scenarios played in each section.